CI Badge: Update Layout

Modified on Fri, 10 May at 4:03 PM

Update Layout


1. Unzip and extract the files (Background and CIBcards83.mdb)


2. Navigate to C:\CI Solutions\CI Badge\Data > make a copy of CIBCards83.mdb


3. Open the original CIBCards83.mdb


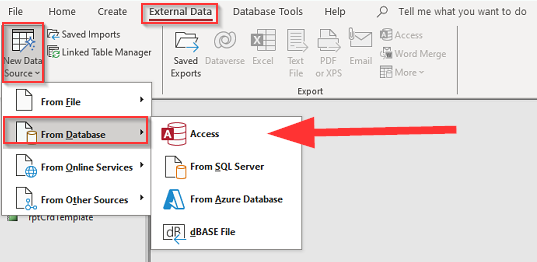
4. Click External Data > New Data Source > from Database > Access


名 0 一 を 「 、 コ - 、 、 ・ 1 31 物 、 q コ 「 0 き き 、 に , 住 を 住


5. Locate your downloaded CIBCards83.mdb 


6. Select Import tables, queries form, reports... > Click OK 


7. Click on the Report tab 


8. Select your reports you want to import > Click OK


0 、 8 》 suoday


If the name of the report is the same, it will import and add 1 next to the name.


, S M · -


You can delete the original reports that are not named with "1" and remove "1" from the copies.


9. Right-click the report > Select Design View 


》 s Od


10. Click Page Setup > Page Setup > Page > Printer... > select your printer > Click OK


Home Create External Data Database Tools Help Report Design Arrange Format p Show Margins Print Data Portrait Colum page Size Reports Page Layout rpt Ca rd Stu rptCardDistanceLearning rptC'rdSt&ff Detail rptCa ptC mplat xtFieldC Page Setup iratNamg. stName Printer rDtCardStudentS C) t Printer Speifc page Setup StatÆ Type Where ' R&åy us8028


11. Navigate to Print Options > Click OK 


Home Create External Data Database Tools Help Show Margins Portrait ColumM Page Print Data Report Design Page Setup Right Arrange Format Page Setup page Size Reports Setup Page Layout rpt Ca rd Stu rptCardDistanceLearning Detail rptCa ptC mplat xtFieldC O ratNamq F CAY (3 Datasheet my


Ensure margins are set to 0.


12. Right-click the title bar > Click Save > Close


Create External Data Database Tools Help Home Show Margins Print Data Port m it ColumM Page Report Design Arrange Format Page Setup right-click page Size Reports Setup Page Layout rpt Ca rd Stu rptCardDistanceLearning Detail rptCa ptC mplat xtFieldC iratNa Close All Lalout Peign View Print P  


If you have additional layouts to add, repeat steps 9-12.


Add Layout in CI Badge

1. Open and login as Admin in CI Badge


2. Click Settings

Control Exft Badge custom Feature Card Image C}mge rts  


3. Navigate to the Layouts tab > Double-click the report


4. Assign an user friendly name for your layout


Cl Badge Settings Oota Entrv - c. solutions Create P Click Layout to Paw No t Instdled permission Levee Defa Layouts: Install, Change, and Uninstall pg.-elit'f_ 1 ta CD C..ds Sm Info Cue Layout (Minimum to use Layout)  


5. Choose a personality where the layout will be available


Pas Not Instdled Staff Na rptCa ta rptCe r dDis arc Staff tD C&ds Pass User En tial(s): vois La Info Uninsta  


6. Select the assigned printer and click Save Layout Info


If you have additional layouts to add, repeats step 1-6.


7. Click Exit to return to the Data Entry Screen 


Cl Badge Settings Oota Entrv solutions Create P Defa Layouts: Install, Change, and Uninstall Click Layout to Sclcct L a yut Paw Not Instdled Staff Pa.-elit'f_ CD C.ds Qty: rptCar dDis tm:eLearnino rotCa rdS ta ff tudents (Minimum Required to use Layout) Evds Sm Info Layout  


Now you are able to select a student and print your desired layout.
 

 Data Entry • Cl Add OR Add New Person Enter And Edit Data First: Oate entered: card No: 200jss 10,'27/äZO custom Feature ID cards PM PM rts 9 Ave & St Ave & St St AM Main stop: Control Ode Exft Badge Card Image C}mge Solutions Add Take Mure No ctu Available Print 1 ISO  


Was this article helpful?

That’s Great!

Thank you for your feedback

Sorry! We couldn't be helpful

Thank you for your feedback

Let us know how can we improve this article!

Select at least one of the reasons
CAPTCHA verification is required.

Feedback sent

We appreciate your effort and will try to fix the article